EWR Online Booking Engine Documentation
Overview
The EWR Online Booking Engine is a web-based module provided by GraceSoft, designed to allow properties to accept bookings directly through a website interface. It can be accessed by redirecting from an existing domain, with support for domain masking and Google Free Booking Link integration.
TABLE OF CONTENTS
- Types of Online Booking Modules
- Header Menu Options
- Footer Menu Options
- Home Page
- Customization and Configuration
- Result Page
- Registration Page
- Thanking Page
- Theme and Customization
- Rules and Restrictions
- Email and Custom Message
Types of Online Booking Modules
1. Regular/Daily Booking Module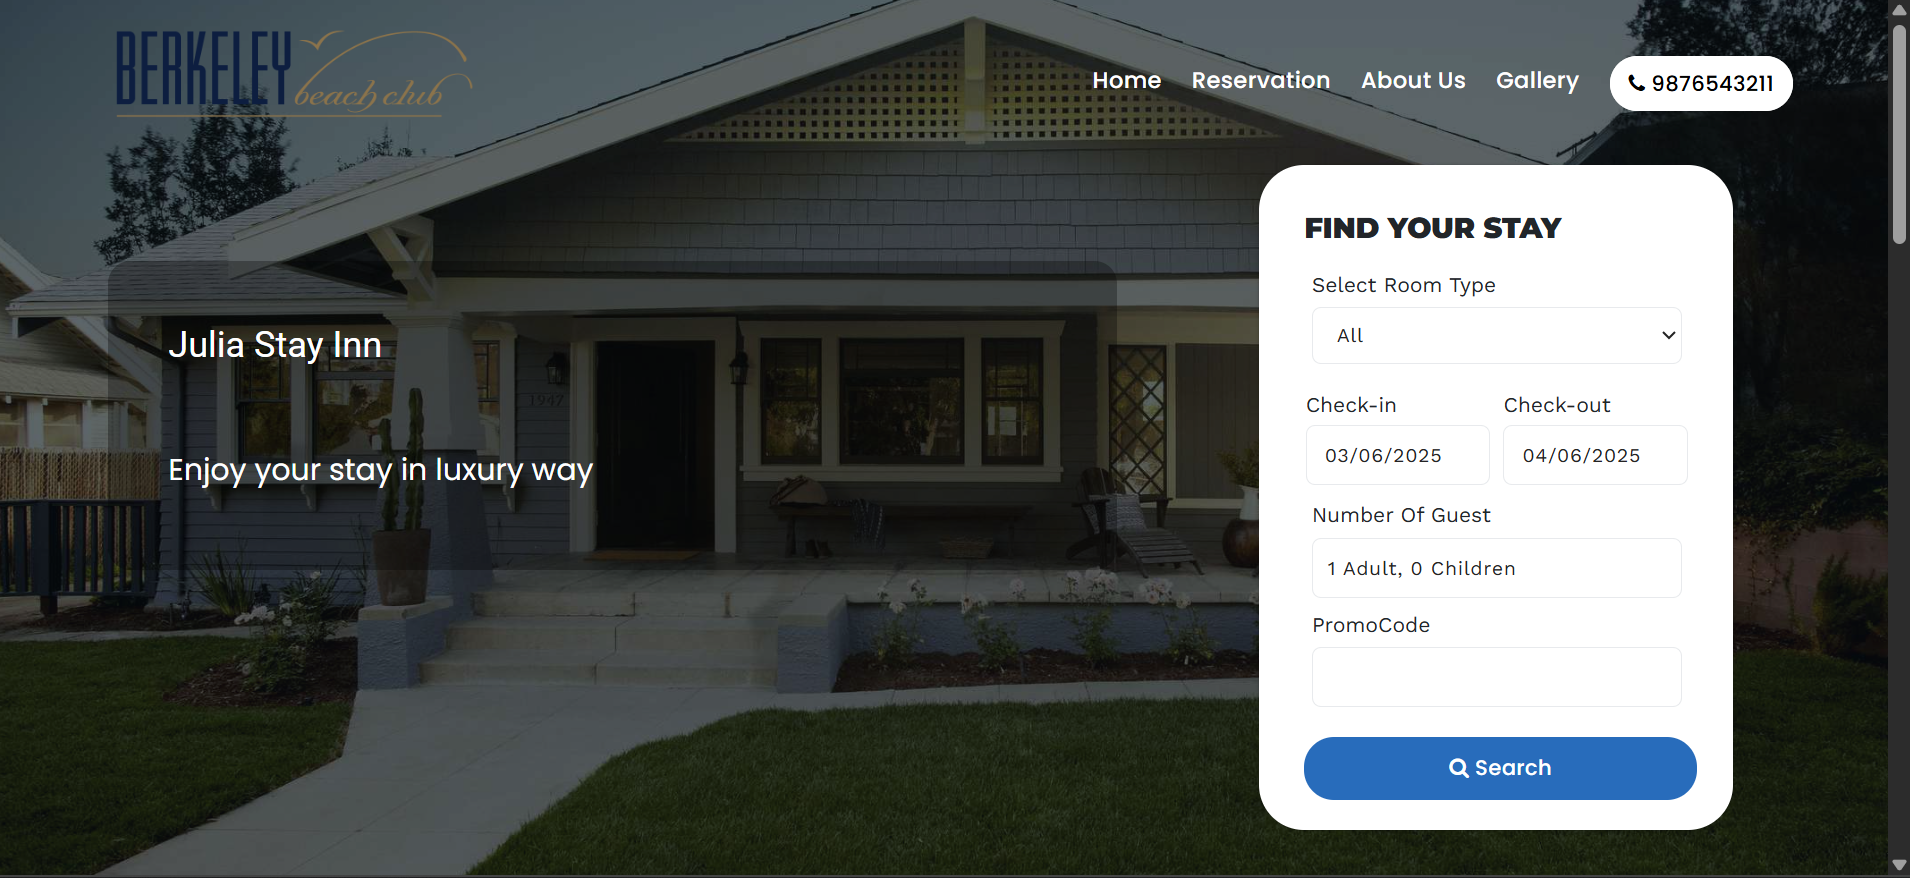
Works with a daily rate format.
https://apps.gracesoft.com/EasyWebRez/roomdetails/5193
2. Group Booking Module
Ideal for bulk bookings (e.g., events, tours).
Allows multiple room selections under a single group reservation interface.
Group Booking:
Individual Group Booking:
https://apps.gracesoft.com/EasyWebRez/roomdetails/5193?group=truehttps://apps.gracesoft.com/EasyWebRez/roomdetails/5193?groupcode=1
How to Generate Group Code- In PMS create any group with active group blocks and enable the Online Booking under Booking Summary.
3. Check Availability Module
Used on the homepage or standalone pages.
Allows users to enter dates and guest count to search for available rooms.
Can be enabled via Super Admin → Calendar View.
https://apps.gracesoft.com/EasyWebRez/calendar/5193
4. Individual Online Booking Module
A booking interface dedicated to a single room type or listing.
https://apps.gracesoft.com/EasyWebRez/individual-booking/1798/75
5. Booking Widget
Embeddable widget that can be placed on third-party websites or partner listings.
Can be accessed from Setup → Web Booking → Online Widget → Booking Engine Version 4.0.
Two predefined widgets will be available with the iframe code.
<iframe scrolling='no' src='https://apps.gracesoft.com/PMS/OnlineWidget/index-v4.html?propid=5193&widget=1&bgcolor=0E3255&fontcolor=fff&btncolor=E86700&btnfont=fff'  width ='100%' ></iframe>
<style>
 @media (min-width: 481px) and (max-width: 767px)
 {
 iframe{height: 380px !important;}
 }
@media (min-width: 320px) and (max-width: 480px)
 {
 iframe{height: 380px !important;}
 }
 iframe{height:210px;}
 </style>
Header Menu Options
The EWR header contains multiple navigation items:
| Menu Item | Function |
|---|---|
| Home | Redirects to the website URL set under Setup → Property Info. |
| Reservation | Returns the user to the first page of the booking engine. |
| Gallery | Enables display of up to 9 images. Managed via Super Admin → Photo Page and Setup → Web Booking → Photo Gallery. |
| Check Availability | Displays the search availability form. Enable under Super Admin → Calendar View. |
| About Us | Displayed if enabled under Setup → Web Booking → Booking Engine Settings → Property Description. Content set in Setup → Web Booking → Information Direction → Property Description. |
Note:
Amenities and Activity Page are deprecated since version 3 (v3).
Footer Menu Options
The EWR header contains multiple navigation items:
| Menu Item | Function |
|---|---|
| Property Name | Setup → Front Office → Property Info → Property Name |
| Address/Contact US | Setup → Front Office → Property Info → Property Name→ Contact Details |
Home Page
Customization and Configuration
How to Enable/Disable Header Menu
To remove the header menu from the online booking engine interface:
Navigate to
Setup → Web Booking → Features to be EnabledEnable: Remove V3 Header
This hides the default menu options.
How to Add a Logo
To display a logo on the online booking engine:
Go to
Setup → Front Office → Property Info → Modify PropertyUpload your Property Logo from this screen.
How to Add a Background Image
To change the first page background image:
Navigate to
Setup → Web Booking → Image Settings → Background Image
Booking Widget
How to Enable/Disable Room Type Selection
To remove the Booking widget menu from the online booking engine interface:
Navigate to
Setup → Web Booking → Features to be EnabledEnable: Disable RoomType
How to Enable/Disable Guest Type Selection
To remove the specific Guest types from the online booking engine interface:
Navigate to
Setup → Web Booking → Search Page SettingsChild = Disable - Disable No of Children
Infant = Disable - Childrens Free Stay
How to Enable/Disable Promocode Textbox
To enable the Promocode textbox from the online booking engine interface:
Navigate to
Setup → Web Booking → Features to be EnabledEnable: Promo Code
Types of PromoCode widget:
- TextBox Field
- DropDown Field
The Texbox Field needs the user to enter the Promocode manually, and then the Promocode will be validated.
The DropDown Field will list all available active promocodes, and the user can select them as they wish.
Footer Room Slider
How to Enable/Disable All Rooms Slider
To remove the All Rooms slider located at the Bottom of the Home page:
Navigate to
Setup → Web Booking → Features to be EnabledDisable: Show All Room
Result Page
Guests can view available room types, amenities, images, and pricing.
The user selects the number of guests and clicks Book Now to proceed.
How to make the display type as Room Name/Room Type
To add the content on the Online Booking Header field(space next to the booking widget) :
Navigate to
Setup → Web Booking → CMS Editor → Choose Online Booking → Property DescriptionAdd content and click save.
How to make the Room active for online
To make the rooms allow booking online, the availability of rooms/roomtype online is determined by online-enabled rooms.
Navigate to
Setup → Unitsetup → RoomsOnline Room: Yes
How to add the Room Description
To add the rooms/room type description.
Navigate to
Setup → Room Type/Unitsetup → Description
How to add the Room Amenities
To add the rooms/room type Amenities.
Navigate to
Setup → Room Type/Unitsetup → Amenities
How to add the Multi Rate
To add multiple rates for rooms/room type.
Navigate to
Setup → Room Type/Unitsetup → Advanced Settings.Set: Multiple Rates as Yes.Choose the desired rates.
How to set Rooms sorting order
To add the sorting order for rooms.
Navigate to
Setup → Unitsetup → Display OrderSet the defined order for the rooms.Need to be defined in numerical order, least value shows first.Note: This will only work for Room name view mode.
Registration Page
Shopping cart
How to display optional items
To add the Inventory items to a shopping cart.
Navigate to
Setup → Frontoffice → Inventory ItemEnable Applied Lodging.
Deposit Type
How to define Deposit
To charge the Deposit for the booking.
Navigate to
Setup → Web Booking → Booking Engine Settings → Select Deposit Payment Requirements.Choose the Deposit type from DropDown.
Recurring Guest
How to enable/disable the Returning Guest field
To charge the Deposit for the booking.
.
Policy
How to add/modify Policy
Navigate to
Setup → Frontoffice → PoliciesOpen the Policy
Enable Display On = Easy WebRez.
Guest Details & Payment
How to Enable Custom Fields
Navigate to
Setup → Frontoffice → Custom LabelsSet Screen as Booking Engine 4.0 in the dropdown.
Choose the Registration page from the drop-down.
Set Custom Label 1 - 5 into "Display Online" to display the field online or "Display Online and Mandatory" to display and make it a mandatory field to be filled by the Guest.
How to Enable/Disable Phone Country Code(need to confirm)
Navigate to
Setup → Frontoffice → Custom LabelsSet Screen as Booking Engine 4.0 in the dropdown.
Choose the Registration page from the drop-down.
Locate Country code and into "Display Online" to display the field online or "Display Online and Mandatory" to display and make it a mandatory field to be filled by the Guest.
How to Enable/Disable Credit Card Field
Navigate to
Setup → Frontoffice → Credit CardSet Validation required or choose any Payment Gateways to display the credit card field.
How to Enable/Disable Guest Document Upload
Navigate to
Setup → Frontoffice → Custom LabelsSet Screen as Booking Engine 4.0 in the dropdown.
Choose the Registration page from the drop-down.
Locate Guest Doc and set it into "Display Online" to display the field online or "Display Online and Mandatory" to display and make it a mandatory field to be filled by the Guest.
Thanking Page
Custom Thanking Page
How to redirect to a custom Thanking page
To make the EWR redirect to a custom thanking page after successful booking.
Navigate to
Setup → Web Booking → Booking Engine Settings → Other SettingsEnable - Custom Thank You Page.Provide the redirect link in the text box.
Theme and Customization
Changing Color
How to display optional items
To add the Inventory items to a shopping cart.
Navigate to
Setup → Web Booking → Booking Engine Settings → MoreScroll down and Locate Color Theme.Apply predefined theme color or Define custom color theme by choosing the "Custom Theme".
Design
How to add/modify content on the Home page
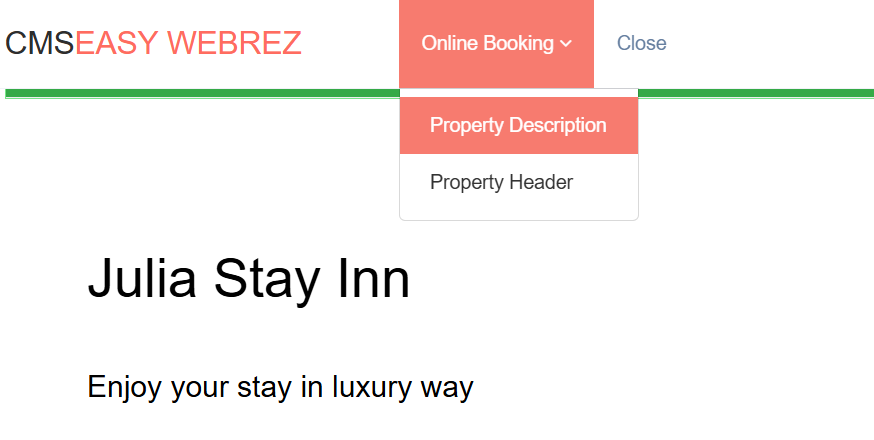
To add the content on the Online Booking Header field(space next to the booking widget) :
Navigate to
Setup → Web Booking → CMS Editor → Choose Online Booking → Property HeaderAdd content and click save.
To add the content on the Online Booking Header field(space next to the booking widget) :
Navigate to
Setup → Web Booking → CMS Editor → Choose Online Booking → Property DescriptionAdd content and click save.
Changing Label
How to modify the Label
To modify the Label for the fields on the EWR.
- Navigate to
Setup → Frontoffice → Custom Labels - Set Screen as Booking Engine 4.0 in the dropdown.
- Choose the desired screen and set the content.
Rules and Restrictions
Reservation Rules
How to Add Min/Max night rules
- Navigate to
Setup → Frontoffice → Reservation Rules - Set the min/max Night Stay.
- Choose the desired days this rule applies.
- Enable: Modules = Booking Engine
- To display custom message for rule violation, provide message under Front Office Rule Message Textbox, Enable EWR.
How to Restrict Specific Day Booking
- Navigate to
Setup → Frontoffice → Reservation Rules - Enable Do Not allow new reservations.
- Choose the desired days this rule applies.
- Enable: Modules = Booking Engine
- To display custom message for rule violation, provide message under Front Office Rule Message Textbox, Enable EWR.
How to Allow Booking only on Specific Days
- Navigate to
Setup → Frontoffice → Reservation Rules - Enable Close To Arrival.
- Choose the desired days this rule applies.
- Enable: Modules = Booking Engine
- To display custom message for rule violation, provide message under Front Office Rule Message Textbox, Enable EWR.
Reservation Restrictions
How to Allow booking after specific day/Hours
Navigate to
Setup → Web Booking → Booking Engine Settings → Search Page SettingsApply Lead Days/Booking Cut Off time.
How to Stop booking after specific day
Navigate to
Setup → Web Booking → Booking Engine Settings → More → Reservation and Rate Settings.Apply Do not allow Online Booking after "Days" or "Date".
To Display custom message, enable and provide content under "Display Message".
Email and Custom Message
Custom Message
How to add custom message for no room availability
Navigate to
Setup → Web Booking → Booking Engine Settings → More → Dynamic Messages.Enable no rooms available custom message.
Enter custom message on the textbox.
Instant Email
How to Enable Instant Email
Navigate to
Setup → Front Office → Reservation Letters → Auto EmailEnable Template 7 Online Confirmation
set Instant email.
How to add Custom Subject Line
- Navigate to
Setup → Web Booking → Booking Engine Settings → More → Dynamic Messages. - Enable Email Subject Name.
- Enter custom subject line on the textbox.
Was this article helpful?
That’s Great!
Thank you for your feedback
Sorry! We couldn't be helpful
Thank you for your feedback
Feedback sent
We appreciate your effort and will try to fix the article