Guest Hub – Enable the Feature
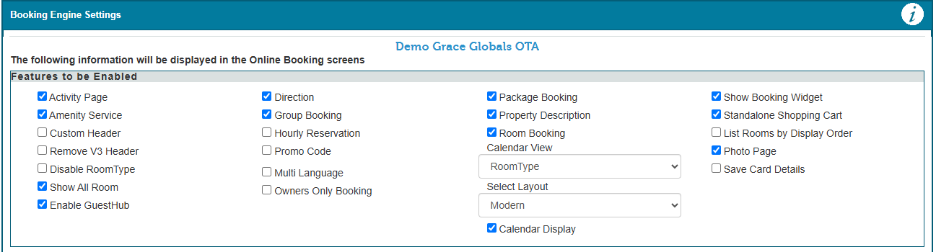
- Go to Setup → Web Booking → Booking Engine Settings.
- Select the Enable Guest Hub checkbox.
- Save the changes.
- Once Guest Hub is enabled, the Guest Hub option will appear under Setup → Web Booking → Advanced Easy WebRez.
In the Guest Hub, we can manage guest access by enabling or disabling the available features based on the property's requirements.
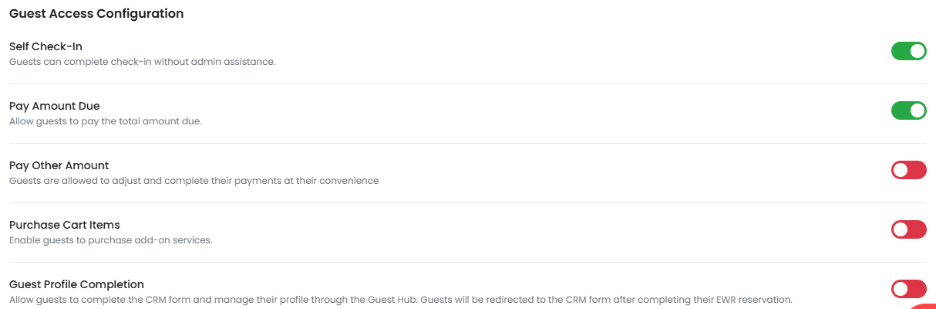 Guest
Guest
Access Configuration
- Self-Check-In – Enable this option to let guests complete the check-in process without admin assistance.
- Pay Amount Due – Enable this option to allow guests to pay their outstanding balance.
- Pay Other Amount – Enable this option to allow guests to enter and pay a custom amount instead of the total balance due.
- Purchase Cart Items – Enable this option to allow guests to purchase available add-on services or items.
- Guest Profile Completion – Enable this option to allow guests to complete their profile through the CRM form. After completing their Easy WebRez reservation, guests will be redirected to the CRM form.
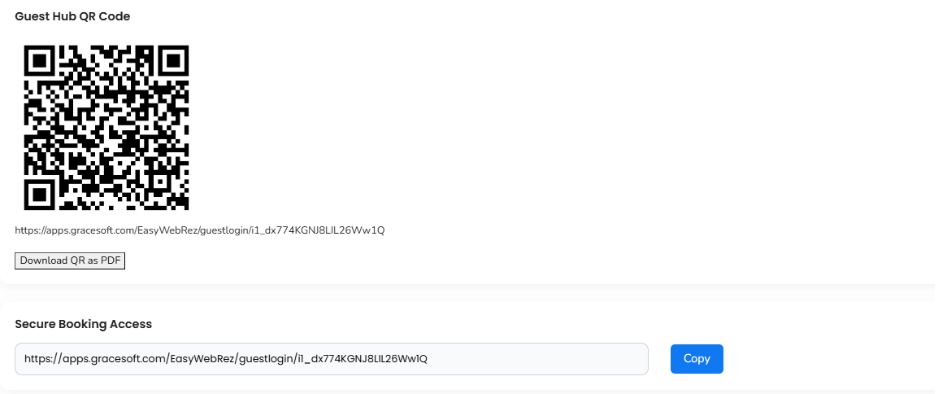
Guest Hub QR Code
On the Guest Hub page, guests can access the Guest Hub Login page by either scanning the QR code using their mobile device or by opening the Guest Hub URL directly. On the login page, guests must enter their Booking Number and the same email address used when making the reservation. Once the login credentials are validated, the guest will be redirected to the Thank You page.
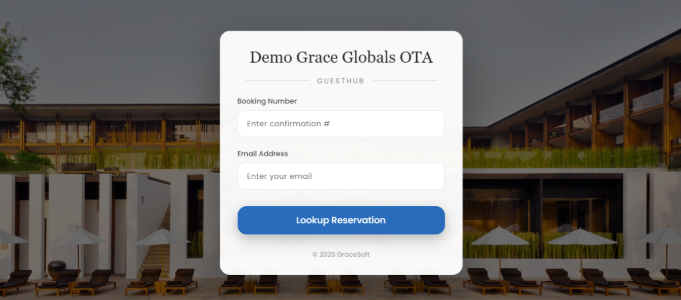
To log in, guests must enter:
- Booking Number
- Email Address (the same email address used when making the reservation)
Once the login credentials are validated, the guest will be redirected to the Thank You page. From this page, guests can view their reservation details and access the available Guest Hub features.
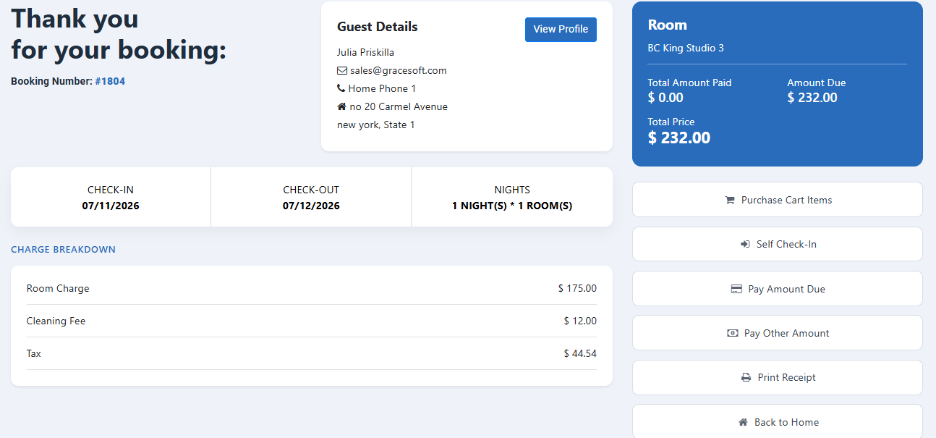
- Purchase Cart Items – Purchase available add-on services or items.
- Self-Check-In – Complete the check-in process online.
- Pay Amount Due – Pay the remaining balance for the reservation.
- Pay Other Amount – Make a custom payment amount toward the reservation.
- Print Receipt – Print a receipt for the reservation payment.
- Back to Home – Return to the GraceSoft home page.
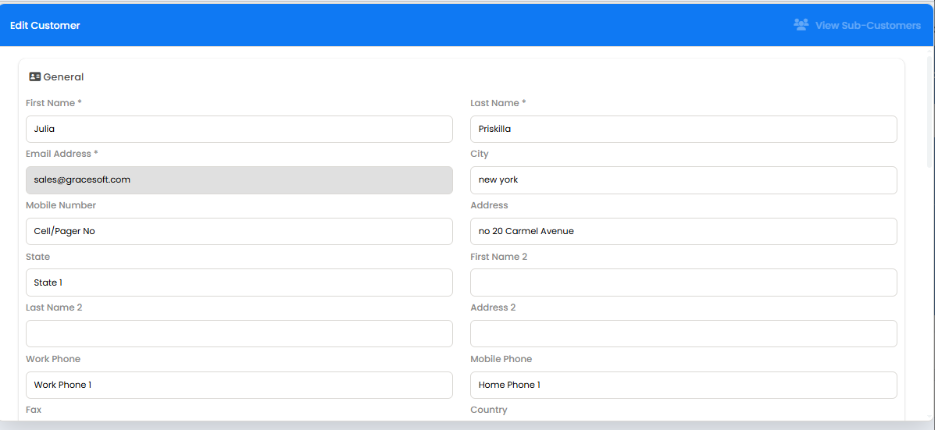
Click the View Profile button to open the Guest Details window. Guests can view and update their personal information. After making the required changes, click Update to save them
CRM
The CRM module helps you deliver seamless engagement across channels with a 360-degree view of your customers. It unifies sales, marketing, and support tools to improve customer communication and satisfaction.
Enable CRM
- Go to Setup → CRM → CRM Config.
- Turn Enable Sync ON to activate CRM synchronization for the property.
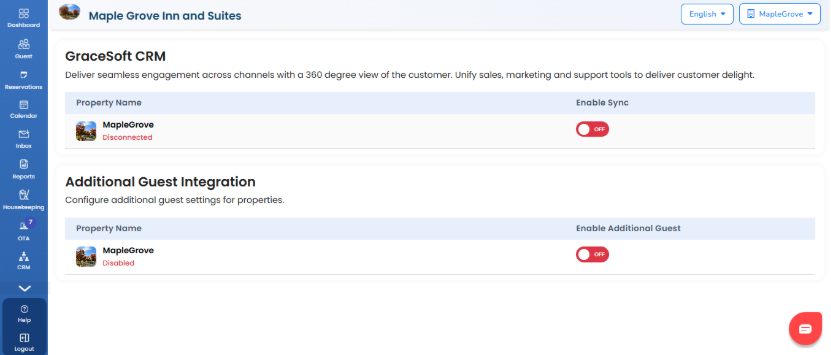
- A confirmation pop-up (Easy Innkeeping PMS & CRM Integration) will appear, displaying the integration rules.
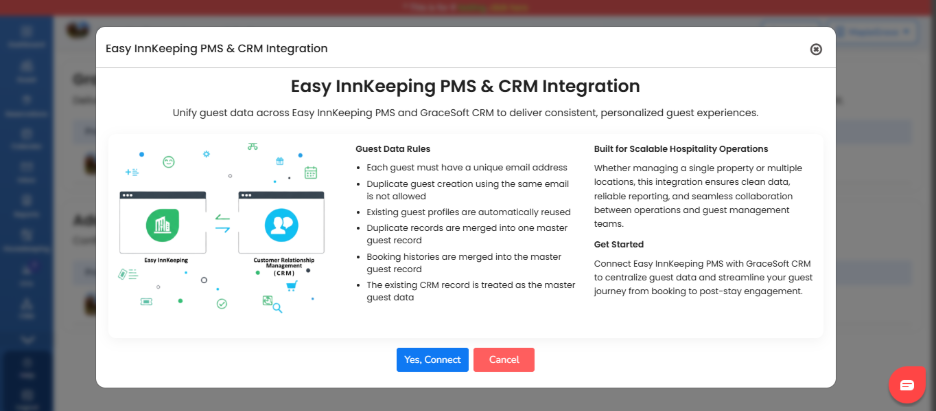
- Review the rules and click Yes, connect to complete the CRM integration.
- Once connected, the property status will be shown as Connected.
- If required, you can also enable Additional Guest Integration by turning Enable Additional Guest ON on the same page.
CRM Integration Rules
- Each guest must have a unique email address.
- Duplicate guest creation using the same email is not allowed.
- Existing guest profiles are automatically reused.
- Duplicate guest records are merged into a single master guest record.
- Booking histories are merged into the master guest record.
- The existing CRM record is treated as the master guest data.
Customer List
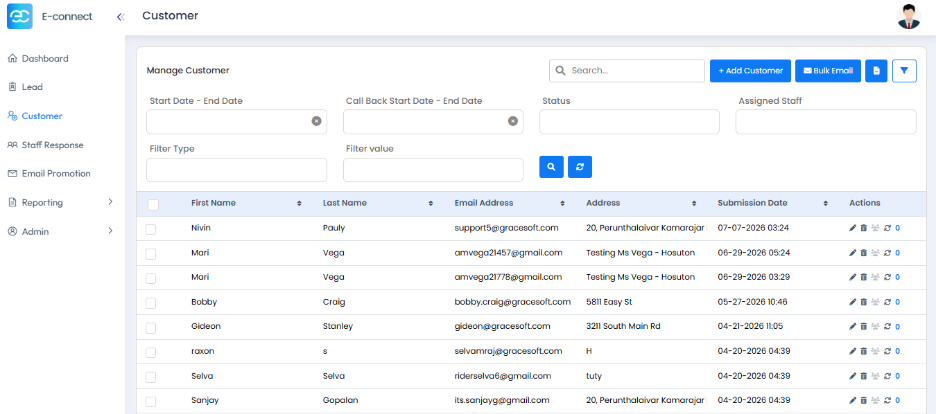
- The Customer module allows you to manage guest/customer records within the CRM.
Customer Management
Go to the Customer from the left navigation menu.
From this page, you can:
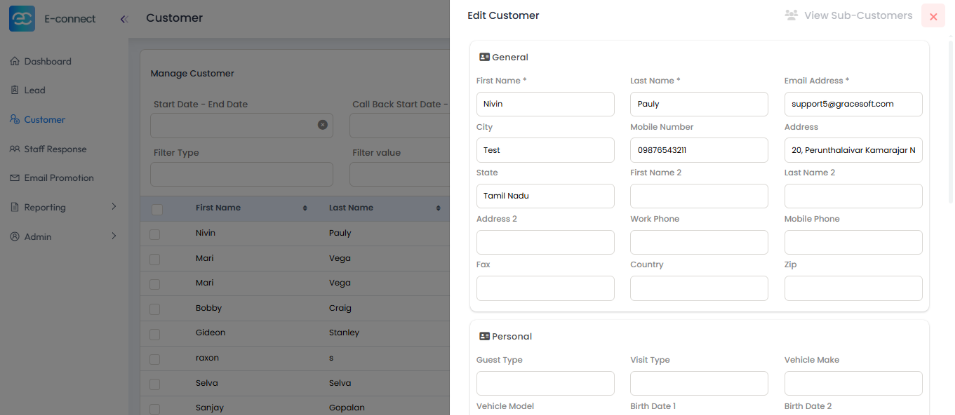
- Add a new customer by entering the required customer details.
- Edit an existing customer by selecting the customer's record and updating the information.
- Delete a customer record when it is no longer needed.
- Filter/Search customer records to quickly find specific customers.
Staff Response
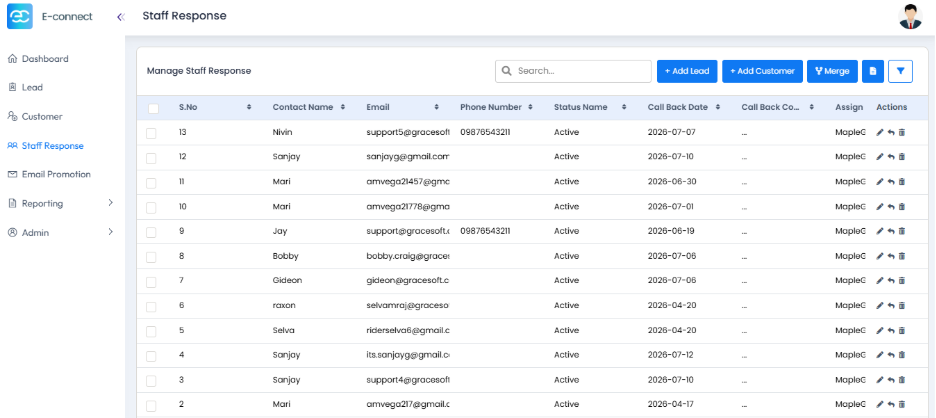
The Staff Response module displays the history of responses sent by staff members to customers.
Email Promotion
The Email Promotion module allows you to create and manage Email Templates and Campaigns.
1. Email Template
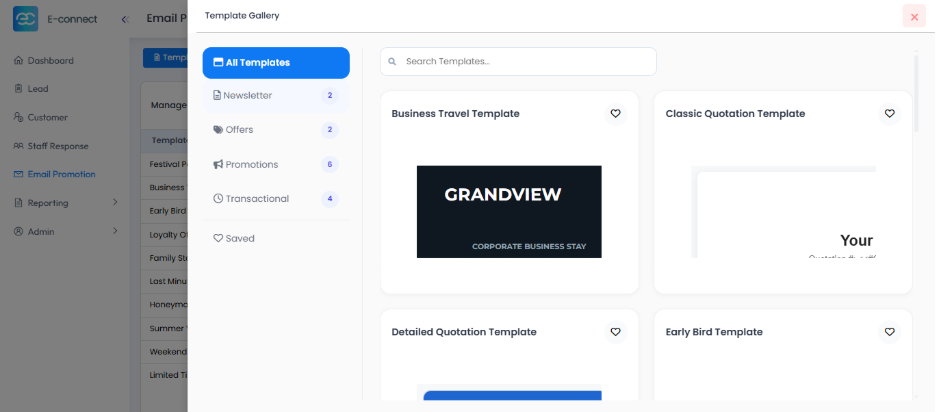
The Email Template section allows you to create reusable email templates.
From this page, you can:
- Create a new email template from scratch using the built-in editor.
- Create an email template using the available custom templates.
- Customize the template content based on your requirements.
Campaigns
- The Campaigns module is used to send promotional emails, newsletters, offers, or announcements to Leads or Customers.
- Create Mail Campaign
- This page is used to create email campaigns.
Audience Filter
This section is used to select the recipients for the campaign.
- Source Type
- Lead – Sends the email to selected leads.
- Customer – Sends the email to selected customers.
- Field Name
- Select the field you want to filter by.
- Example: City, State, Lead Source, Customer Type, etc.
- Operator
- Used to define the filter condition.
- Examples: Equals, Not Equals, Contains, Starts With.
- Value
- Enter the value for the selected field.
- Example: Field Name = State and Operator = Equals, enter California.
- Add Condition
- Add additional filter conditions to further narrow the audience.
- Get Email Count
- Displays the total number of recipients who match the selected filter criteria.
- Campaign Name - Enter a name for the email campaign.
- From Email: Select the email address from which the campaign email will be sent.
- Select Template - Choose a pre-designed email template. If --No Template-- is selected, you can create the email manually.
- Subject: Enter the subject line that recipients will see in their inbox.
Once all the required details are entered, click Create Campaign to create the campaign.
Custom Fields
- Used to add additional fields wherever required.
Add Custom Field – Lead Status
If you need to add a Lead Status field under the Lead Source tab, follow these steps:
- Go to Admin → Custom Fields.
- Click Add Custom Field.
- Enter the following details:
Field | Value |
Field Name | Lead Status |
Field Type | Text Box |
Form Type | Lead |
Tab Order | 1 (Lead Source tab) |
Order in Tab | 6 |
- Click Save.
Note:
- Tab Order = 1 places the field under the Lead Source tab.
- Order in Tab = 6 displays the Lead Status field after the Comments field within the Lead Source section.
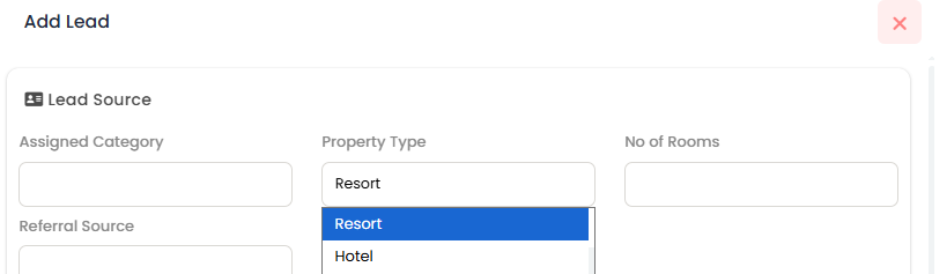
If you need to create a dropdown field instead of a text box, follow the same steps used to create a custom field.
- Go to Admin → Custom Fields.
- Click Add Custom Field.
- Enter the required details:
Field | Value |
Field Name | Property type |
Field Type | Dropdown |
Form Type | Lead |
Tab Order | 1 (Lead Source tab) |
Order in Tab | 2 |
Field Options | [ {"Text": "Resort", "Value": " Resort"}, { "Text": "Hotel", "Value": " Hotel " },] |
Note: The values specified in the Field Options will appear as dropdown options. In the above example, the dropdown will display Resort and Hotel as selectable values.
Was this article helpful?
That’s Great!
Thank you for your feedback
Sorry! We couldn't be helpful
Thank you for your feedback
Feedback sent
We appreciate your effort and will try to fix the article