QuickBooks Setup Page:
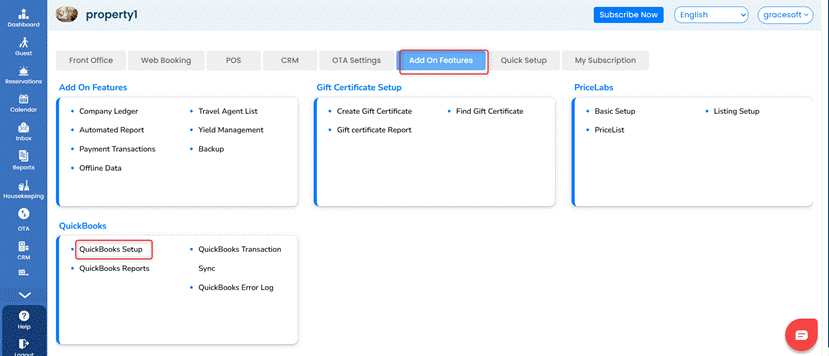
- Go to SetupàAdd on FeatureàQuickBooksàSelect” QuickBooks Setup”
- The QuickBooks Setup screen will display Clients QuickBooks Authorization details. During installation, one of our team members will generate all the required credentials for your QuickBooks interface and enter it in this screen.
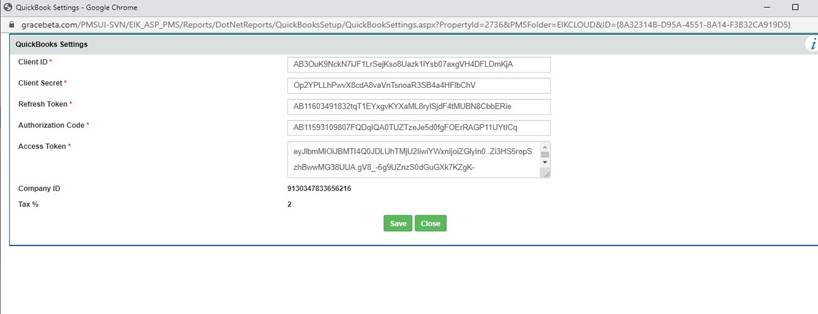
- After this setup is complete, our team member will assist you in setting up account codes to be synchronized between Easy Innkeeping and QuickBooks
Assign QuickBooks Income accts to Easy Innkeeping
Before setting up the synchronization, you first must assign QuickBooks Income accounts to your lodging, product and service sales in Easy Innkeeping.
To Find QuickBooks Income Accounts
- Login to your QuickBooks account.
- Go to the gear icon and select Chart of Accounts
- Make note of the Income Accounts you use for services & items sold in Easy InnKeeping (e.g. Lodging Income, Sales of Product income etc.)
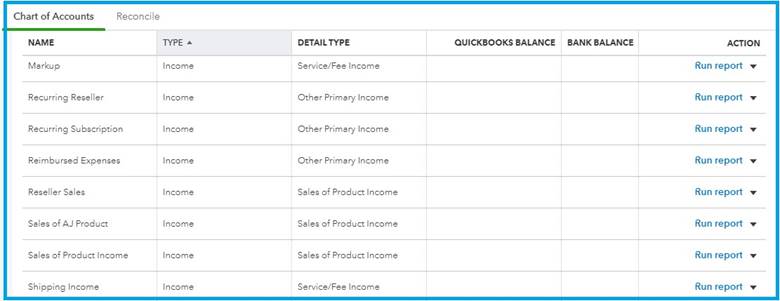
Update QuickBooks Income Acct in Easy InnKeeping
Please note, if you do NOT assign a QuickBooks Income type, a default Income Type will be assigned when you setup the customer data transfer. If you already have Products & Services defined in QuickBooks, it’s best to follow these steps to assign the specific Income type you have setup in QuickBooks.
- Go to Setup >>Front Office>>Accounts>>Inventory Items
- Click “Inventory Items” and the account code popup window will Open.
- Click on the Subgroup tab.
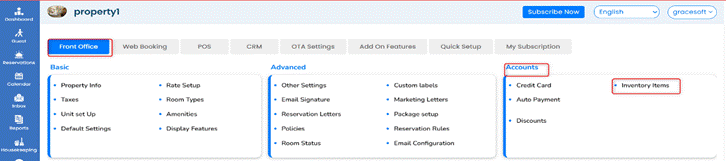
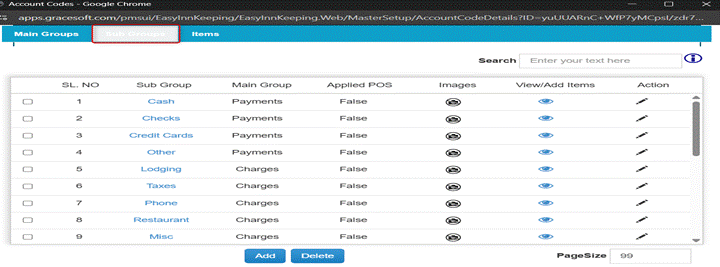
- The QuickBooks Income account needs to be assigned for every Subgroup. You will need to update this assignment for Lodging and any other Subgroups created under ‘Charges.’
- Click on the Lodging Subgroup and select the correct Income Type. The Income Type list that appears is imported from your QuickBooks account. Click Save to update the QuickBooks Income.
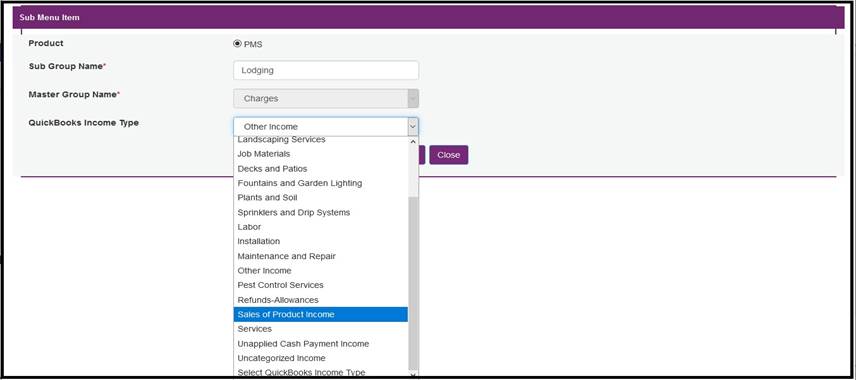
- Click on the next Subgroup, such as Phone, Restaurant or any other Subgroup you have created in Easy Innkeeping. Follow the same steps to assign QuickBooks Income type and save.
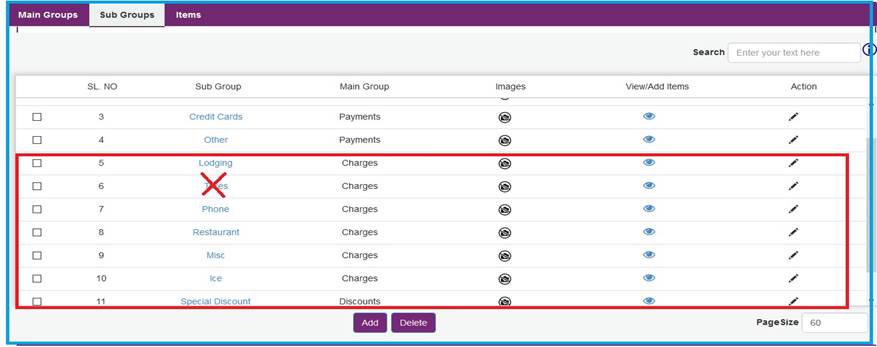
- Continue until all Subgroups under Charges and Discounts are assigned a QuickBooks Income type.
- Please note. You do NOT need to assign a QuickBooks account for Taxes.
Setup Transaction Synchronization
Before sending transactions to QuickBooks, you need to export the account codes that will be synchronized between the two systems. Account codes are sent during Setup and also anytime NEW account codes are added to Easy Innkeeping.
- Go to SetupàQuickBooks Transaction Sync
- Under Select Data, click on Account Data.
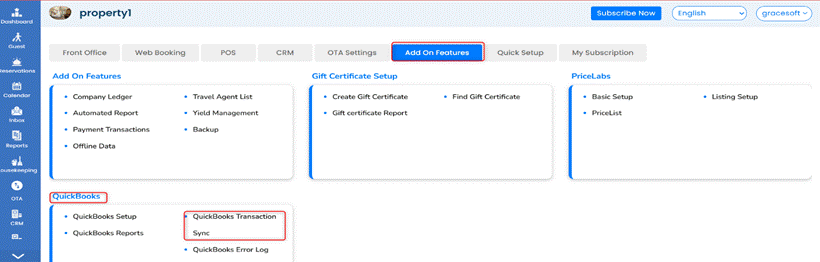
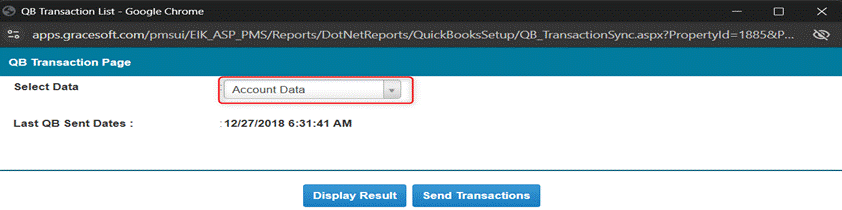
- Then click on Display Results
- All the transactions which are ready to transfer to QuickBooks will display here.
- Click “Send Transaction” and the data will be exported to QuickBooks.
- “Data pushed successfully” message will appear when the transfer is complete.
Verify Account Code Export to QuickBooks
- If you want to verify how Account Codes appear in QuickBooks.
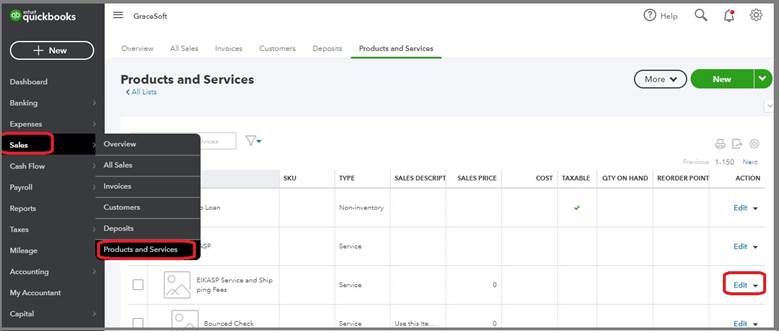
- Login to QuickBooks account
- Select Sales>>Products and Services and any new Account Codes exported from Easy Innkeeping will appear here.
About Transaction Synchronization
- The QuickBooks interface is designed to transfer only reservations that have been fully paid.
- If a guest has fully paid for their reservation, then the Customer Data, Invoice, and Payments will be sent to QuickBooks. Before sending transaction data, be sure all the reservations for that date range have been fully paid and list amount due as 0.
Sample Reservation:
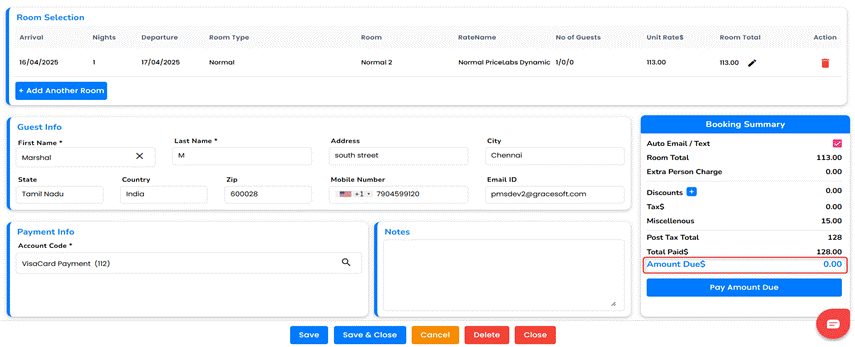
Guest Fully Paid data only display in “QuickBooks Transaction “Page
Sending Customer and Reservation Data
- Go to Setup>>QuickBooks Transaction Sync
- Under Select Data, click on Customer Data.
- Then click on Display Results
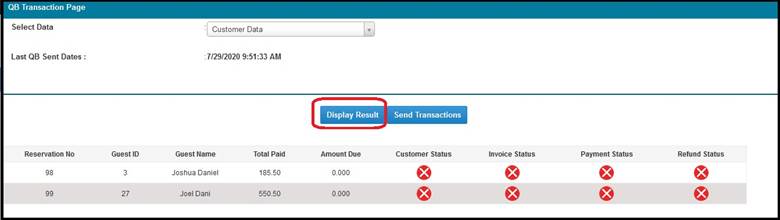
- All the transactions with amount due -0, and have not yet been sent to QuickBooks will display here.
- The first time you send customer data, it will send up to 30 days of past completed transactions (e.g. if Today is July 29th, transactions from June 29th to July 29th will be sent).
- On subsequent times, when you click Send Customer Data it will pickup any transactions not send in the past and send it.
- Click “Send Transaction” and the data will be exported to QuickBooks.
- “Data pushed successfully” message will appear when the transfer is complete.
If there is any connectivity issue between QuickBooks and Easy Innkeeping, an Error log page will display a message here. Error: While Pushing Data
QuickBooks Reports
- Easy Innkeeping provides several reports that display activity of transactions and data sent to QuickBooks.
Account Code Report
- You can run this report after you first setup your interface, or anytime you add new account comes to Easy Innkeeping that need to be synchronized with QuickBooks.
- Go to SetupàAdd on FeaturesàQuickBooks Reports
- Click on the drop-down list to select Account Code Sent.
- Enter dates by clicking on the calendar icon next to From Date and To Date.
- Click Display Results
- You may either Print, Export to Excel, Export to Text or Export to XML format.
Customer Data Report
This report will display all reservations with customer payments.
- Go to Setup>>Add on Features>>QuickBooks Reports.
- Click on the drop-down list to select Customer Data Sent.
- Enter dates by clicking on the calendar icon next to From Date and To Date.
- Click Display Results.
- You may either Print, Export to Excel, Export to Text or Export to XML format.
Customer Refund Report
A separate report is provided for refund transactions.
1. Go to Setup>>Add on Features>>QuickBooks Reports
2. Click on the drop-down list to select Refund Sent.
- Enter dates by clicking on the calendar icon next to From Date and To Date.
- Click Display Results
- You may either Print, Export to Excel, Export to Text or Export to XML format.
Troubleshooting Failed Synchronization
On occasion due to connectivity issues, or mis-match in account codes; some transactions may fail to transfer from Easy Innkeeping to QuickBooks. Provided is a detailed error log for any failed transactions.
If you receive an error, please contact Grace Soft Support at support@gracesoft.com or on Live Chat for assistance.
To display error logs, you may do the following
- Go to Setup>>Add on Features>>QuickBooks Error Log
- Select from any of the options: Connectivity Log, Account, Customer Log, Invoice Log, Payment Log, or Refund Log
- Enter dates by clicking on the calendar icon next to From Date and To Date.
- Click Display Results
- You may either Print, Export to Excel, Export to Text or Export to XML format.
Was this article helpful?
That’s Great!
Thank you for your feedback
Sorry! We couldn't be helpful
Thank you for your feedback
Feedback sent
We appreciate your effort and will try to fix the article